Compost Bin
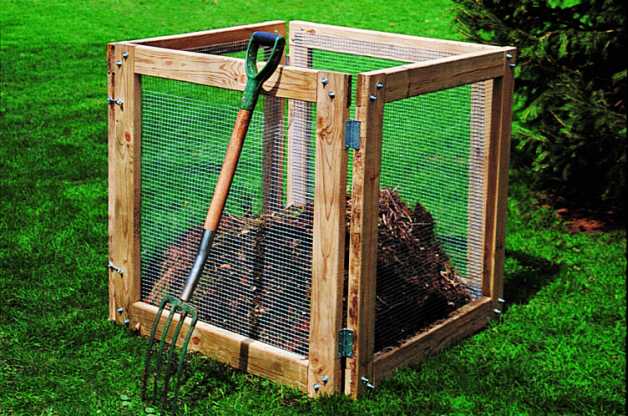
While many folks simply dump their backyard waste in a heap, this handy bin keeps the goods neatly stacked. It also provides excellent air circulation to efficiently turn clippings, leaves and vegetable waste into rich compost.
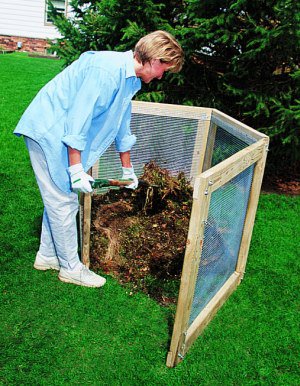
As a bonus, the entire bin opens up on any side, making the periodic, turnings of the pile and easy and hassle free task.

Tools
Recommended Tools…
Table or circular saw
Rafter square
Power drill
Chisel
Rasp
Tin snips
Pliers
Heavy duty work gloves
The Plan
This plan is simple enough to get you rstared, but we’ve included a few more tips on the next page to elp you produced you own gardeners’s gold.
Here’s What you’ll need… Eight pressure – treated 6-foot 2x4’s
Thirty-two 5/16 –inch x 2-inch carriage bolts, nuts and washers
Four 3-inch door hinges
Four large hook-and-eye assemblies
12-foot x 36 – inch hardware cloth, ½ inch squares
Poultry wire staples
Waterproof construction adhesive
Directions
1. Cut each 2x4 in half to make 16 3-foot pieces.
2. Cut a 3-1/2 inch x ¾ inch deep notch (known as a rabbet) in both ends of each piece. You can do this on table swaw or with a circular asw. Make several close sucts (about 1/8 inch apart) across the grain in the notched section. Then, use a hammer and chisel to break out the wood betwwn theses cuts. Smooth with a rasp.
3. Fit the notched ends together to make foru 3-foot square frames. Drill holes for two carriages botls in opposite corners of each notch (see illustrations at the top right). Use construction ashesive in each joint before assembling. The nuts should face the outside so that the bolts wont catch on hour clothes when your turning the pile.
4. Use tin snips to cut the hardware into four 3 foot – square sections.
5. Tack each corner of the hardware cloth to the frame with poultry wire staples. Then staple around the frame every 2 inches.
6. Connect two frames with two door hinges, then put two hook-and-eye gate latches on the other ends. Repeat this step for the remaining two frames.
7. Stand the frames to form a square and latch the sections together.
Here’s how it works-
What’s the best and cheapest way to improve your flower gardens? Start by making compost. It’s the perfect amendment to garden soil and, best of all, it’s free! Like magic, this ‘black gold’ can be made right at home from yard and kitchen waste, Once these materials break down, they’ll serve as a rich additive or mulch that will help your gardens thrive. Here are a few basics to get your started.
The Perfect Ingredients
Equal amounts in weight of green waste (nitrogen sources) with brown waste (carbon sources) will create excellent compost. This balance will provide a perfect mix for rapid decomposition.
What are green and brown wastes? Here are some found at your house:
Grass clippings (green waste)
Fallen leaves (brown waste)
Kitchen scraps, such as eggshells, coffee grounds and fresh fruit and vegetable peelings (green and brown waste)
Newspaper (brown waste)
There are a few items that you should avoid tossing into a compost bin. These include: Dairy Product Pet Waste Disease and insect-infested plants
Animal products, such as meat, chicken or fish; egg whites or yolks; and bones or skins
Weeds with seed heads
Findings the proper location for your compost bin is as important as the proper locations for your compost bin is as important as the proper ingredients. Locate it in a level, well-drained area in full sun. Be sure it receives good air circulation and is kept moists enough to help break downs the matereials. The pile should be moist like a sponge, but not soaking wet.

When is it ready?
It can take three months to 2 years to make finished compost. The more attention you give the pile (frequent turnings, proper ingredients maintaining proper moisture, etc. ), the faster it breaks down.
To turn the pile, simply mix or toss it with a garden fork (see photo at far left), or poke air holes into it with a broom handle.
The process is finished when the bottom of the pile has dark, rich soil that crumbles in your hand.
Compost can be tilled into your garden, used as a mulch, serve as a starter mix for seedlings or for repotting houseplants. You may even try soaking it for a few days in water to make compost tea, which will give your plants an extra fertilizer boost.
*This helpful project is from Birds & Blooms Books - Backyard Projects
